


I’m a firm believer in fair use when it comes to audio media — if you bought it, you own it, and you’re free to do with it as you please — as long as it’s for your personal enjoyment and you’re not trying to sell it illegally for profit. Apparently the code writers/hackers in the world agree with me, and it’s really great that we can finally transcode just about any digital file type that exists to ensure compatibility with ever-evolving audio equipment. I’m departing from my usual review format to focus on a developing technology I’ve been following for several years now, which is the ripping of SACD discs and the extraction of the Direct Stream Digital (DSD) layer. I first became aware of this about three years ago, and have followed its progress with great interest, although I haven’t had the tools available to me to make this happen until just a few weeks ago. Why a nearly-dead, niche technology like SACD, you may ask — my involvement with it goes all the way back to my very first gig in audio journalism, twenty years ago at the old Audiophile Audition website.
I wrote my first piece for Audiophile Audition in 2001; the SACD format had been unceremoniously launched the year before to very little fanfare. SACD offered great promise, with many technological positives; the only real downside being the somewhat prohibitive cost of the discs and players. In the year following SACD’s release, John Sunier (the now-deceased editor at AA), offered me what would prove to be a ridiculously generous and nearly unlimited flow of SACD discs from all the major record labels. I also received discs from a multitude of smaller labels who were eager to jump on board the SACD bandwagon — and I didn’t even have an SACD player at the time. Fortunately, manufacturers and record company reps were keen to get information about the new technology out there, and were very accommodating when it came to getting hardware into the hands of reviewers.
My experience with SACD was that its playback was revelatory; no other digital disc could come close to providing the level of clarity, organic purity, and very nearly analog-like sound quality. By the time the major labels pulled the plug on the format in 2009, I had amassed a collection of over 300 titles. And I’ve added more in the decade since then, bringing me to a total of about 400 discs. I don’t play them as much as I’d like, because I’ve pretty much become a slave to the convenience of streaming digital music. I’ve purchased a number of high-res downloads — including some DSD downloads (about a dozen). However, the cost is prohibitive, so I haven’t gone all-in with DSD downloads. But having so many SACD discs on hand, I’ve always dreamed about being able to add those to my digital music library for convenient playback.
The first time I read anything online about being able to rip an SACD, it involved what appeared to be a mega-complicated process of exacting procedures, requiring very specific, no-longer-in-production equipment with very limited availability. At that point, this was limited to certain Oppo universal players and early Sony PlayStation models. And if the firmware on any of those units had been updated beyond a certain point, they would no longer perform the process, which was fairly long and involved, and apparently placed a significant strain on the lasers of the units being used for ripping. You’d read lots of threads with people literally pulling their hair out over failed ripping attempts, or over finally locating a correct Oppo or PlayStation unit, only to find that they’d been run to death ripping SACDs. Becoming an SACD-ripping early-adopter didn’t appear to be in the cards for me.

I pretty much had given up on it until about a year ago, when I stumbled onto a thread linked to the Sonore (manufacturer of Rendu streamers and associated equipment) website that referenced a program called ISO2DSD. Googling that eventually led me to the HiFi Haven website, where there’s an entire thread dedicated to ripping SACDs. Which is a tad daunting, because the thread has 140 pages of comments that range from relatively cryptic tidbits of absolutely essential information, to full blown rants detailing chaotic failures at the process. I waded through a mountain of detailed information for seemingly countless hours — even days — and eventually picked up some essential clues on how to make the process actually work. I’d recommend going ahead and registering for the site — like I did, you may find yourself occasionally stuck in the process, and have a need to reach out to anyone who might be able to provide some guidance or perhaps a clarification.
The process of ripping SACDs has gotten significantly easier over the last couple of years. I guess there are folks out there with lots of time on their hands, the ability to write sophisticated programs that have seriously simplified the process, and the time to test a ridiculous variety of players to confirm whether they will actually work with the programs. The very first step can be found on the HiFi Haven website, on page 1 of the thread, midway down the page, where there’s a comprehensive listing of player models that will work for SACD ripping. These are all currently Blu-ray players (that support SACD playback) that incorporate a MediaTek chipset that’s needed to make ripping possible. The MediaTek chipset was introduced in 2010, and was commonly used in the players listed below from 2012 through 2017. That list currently includes:
Sony brand compatible Blu-ray players:
BDP-S390 (also sold as BX39 in some markets)
BDP-S490
BDP-S590 (also sold as BX59 in some markets)
BDV-E190
BDP-S4100
BDP-S5100 (also sold as BX510 in some markets)
BDP-S6200* (also sold as BX620 in some markets, requires Sony ARMv7 AutoScript sacd_extract_6200 version)
BDP-S7200* (requires Sony ARMv7 AutoScript sacd_extract_6200 version)
BDP-S790* (requires Sony ARMv7 AutoScript version/S790 variant)
BDP-A6000* (requires Sony ARMv7 AutoScript sacd_extract_6200 version)
BDV-NF720 (requires Sony ARMv7 AutoScript sacd_extract_6200 version)
BDP-S6500* (also sold as BX650 in some markets, requires Sony ARMv7 AutoScript version/S6700 variant developed June 2020)
BDP-S6700 (not recommended, only certain early production is compatible)
UHP-H1 (requires Sony ARMv7 AutoScript version/S6700 variant developed Jun. 2020)
Pioneer brand compatible Blu-ray players:
BDP-80FD
BDP-160
BDP-170
MCS-FS232 * (requires Sony ARMv7 AutoScript version S6200/7200 variant)
Oppo brand compatible Blu-ray players:
BDP-103 and 103D
BDP-105 and 105D
Cambridge brand compatible Blu-ray players:
Azur 752BD
CXU
Arcam brand compatible Blu-ray & CD/SACD players:
FMJ UDP411
FMJ CDS27
Primare brand compatible Blu-ray player:
BD32 MkII
Electrocompaniet brand compatible Blu-ray player:
EMP3
Denon brand compatible Blu-ray player:
DBT-3313UD and 3313UDCI* (requires Sony ARMv7 AutoScript version/S790 variant)
MSB Technology brand compatible Blu-ray players:
Universal Media Transport V
Signature UMT V
Yamaha brand compatible Blu-ray Player:
BD-S677
Marantz brand compatible Blu-ray player:
UD7007* (requires Sony ARMv7 AutoScript version/S790 variant)
I’m pretty certain few (if any) of the player models listed are in current production, and some of the Sony models sold for less than $100 USD when brand new at stores like Target, Costco, and WalMart. A number of them can be found online at sites like eBay for around $50 or less, and numerous posters have detailed finding one of the player models at thrift stores like Goodwill. I bookmarked the model listing page on my cell phone and started a casual search for one of the players; I often frequent thrift stores looking for cheap CDs, and virtually every one I go into regularly has a half-dozen or so Blu-ray players priced anywhere from $10 to $20. From all accounts on the HiFi Haven SACD ripping thread, one of the players that’s most commonly available and used for ripping is the Sony BDP-S5100 (also sold as BX510 in some markets). I decided to forego the online search for one of the players, choosing instead to trust dumb luck in finding a functioning unit in a thrift store.

My frequent thrift store searches were unsuccessful over a period of about a year, until a couple of weeks ago, when I found a very clean Sony BX510 player at a Goodwill for $11. Woo hoo! I have a personal theory that a lot of disc players donated to Goodwills and the like were probably only used for DVD or Blu-ray playback, and probably not subjected to extreme usage or abuse, meaning that the SACD drive function is more than likely pretty pristine. The BX510 I scored came without a remote; being able to access the player’s setup menu is essential to getting the ripping process to properly function. Luckily, I happened to have a newer model Sony Blu-ray player (purchased at WalMart for about $50) in my living room, and its remote worked perfectly with the BX510. Barring all else, working remotes can be gotten from Amazon for less than $10.

You’ll need to connect the player to a monitor or TV, and you’ll need the remote to make a few basic settings on the player’s on-screen setup menu. 1) Go to the Audio Settings tab, and turn the DSD Output Mode to “Off.” 2) Then go to the BD/DVD Viewing Settings tab and set the BD Internet Connection to “Do Not Allow.” 3) Go to the Music Settings tab and set the Super Audio CD Playback Layer to “SACD.” 4) Go to the System Settings tab and set the Quick Start Mode to “On.” I also set the System Software Auto Update to “Off,” even though the current conventional logic is that it’s no longer critical to the machine’s ability to rip SACDs. 5) Finally, you’ll need to go to the Network Settings tab and choose between “Wired” or “Wireless” — once again, the original thought process with SACD ripping was that wireless wasn’t feasible because of the huge data transfer going on, but recent experiences have shown that not to be the case. I’ve actually had good success with a wireless connection, so whichever path you choose should work for you.
Okay, so now that you have your player set up, there are a couple of other considerations that need to be made. First of all, you need to download the latest version of JavaOS for your computer’s OS; the ripping program is based on Java, and requires a minimum of Java Version 8 to function properly. Most computers use Java to assist or manage a variety of functions, but you do need to confirm that you at least have Java Version 8 running.
 The biggest advance in SACD ripping came with the introduction of the SACD Extract GUI software in 2018. The software will work in Windows, Mac, or Linux environments; when you click on the link, it takes you to page 15 on the HiFi Haven SACD ripping page. In the post, you’ll see two buttons marked “Spoiler: AMD/Intel” and “Spoiler: Raspberry PI”; click on the one that pertains to your computer system processor setup, and opening them will reveal the download links that match your OS. Download the .zip file, extract it, and place it not buried too deeply on your system hard drive; for example, if using a Mac, place it in the Application folder. With Windows, place the file somewhere on your “C” drive, like in the Program Files folder.
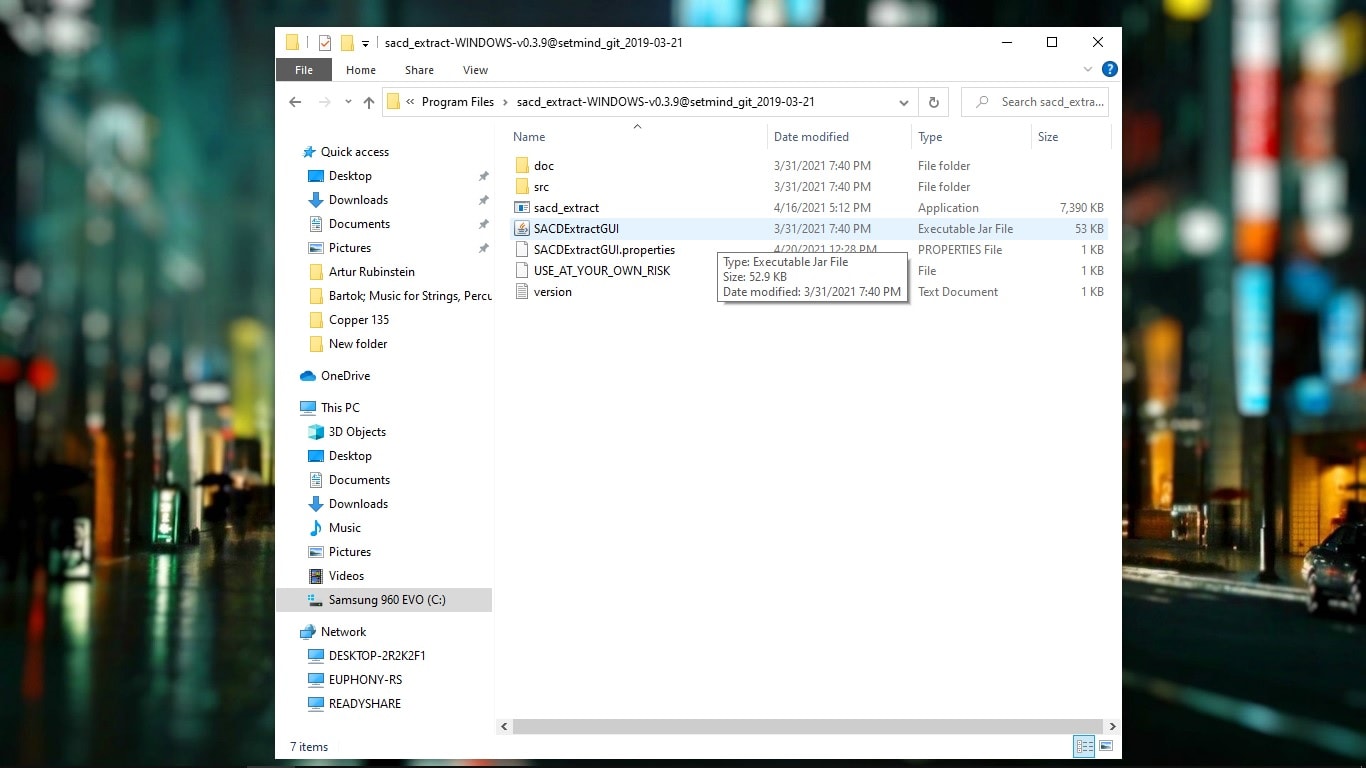 The download package includes a number of files, but only two require any attention from you; the one named “SACDExtractGUI” is the actual application and visual interface that you launch every time you rip an SACD. The second file you need to be concerned with is one that’s named “SACD_Extract”; this is an executable program that governs the ripping process on your computer. No installation is necessary of any of the executable (.exe) files; they automatically run when the program is launched. All the software here is open source, which means that many developers are making regular improvements; one just happened recently that has fixed some problem issues I had with certain discs not ripping. This tends to be a problem most often with classical SACDs, where the metadata character string for a particular file exceeds 256 characters — it happens a lot more often than you might imagine, and the ripping software originally couldn’t process files that exceeded that limitation. Fortunately, there’s a fix; go to page 142 of the HiFi Haven thread; midway down, click on the link EuFlo’s GitHub repository, and scroll down to the bottom of the page. Choose the -99 link that matches your operating system. Extract the files, then delete the “SACD_Extract” file from your existing software folder and replace it with the new one you just downloaded. So far, everything I’ve ripped has worked perfectly with the new executable file.

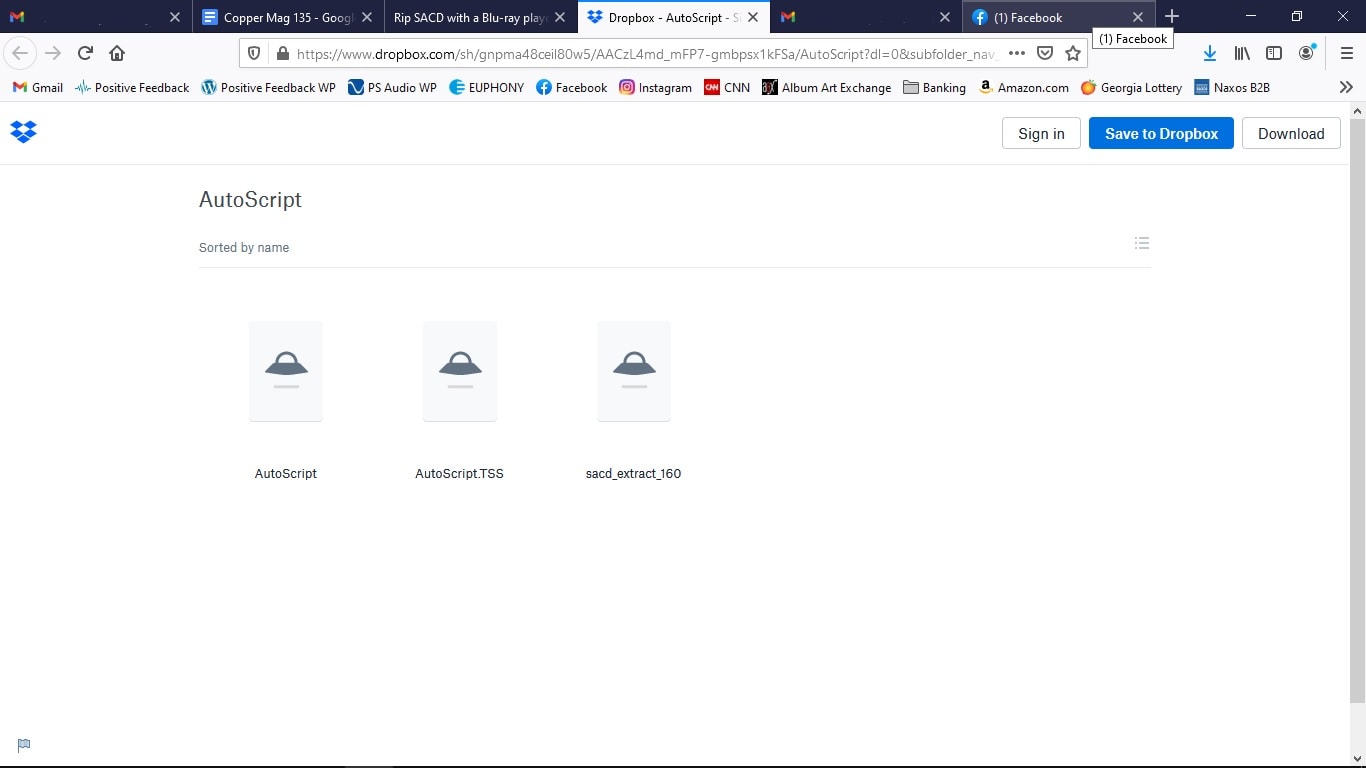
The last physical thing you need is a USB flash drive; preferably at least 4 GB, though the files you’ll be loading to it are fairly small. The flash drive should be formatted as FAT 32 (MS-DOS) or NTFS, with Master Boot Record (MBR) chosen as the partition scheme. This part is VERY IMPORTANT to the overall success of the process. I’m running Windows 10, and I’m not completely certain that it will allow you to format a flash drive using MBR — I wasn’t able to get any of this working properly until I used a Mac to format the flash drive as MS-DOS and MBR, and now it works with both Macs and Windows. After formatting your flash drive, go to page 2 of the HiFi Haven thread; midway down the page, there’s a reference to an AutoScript download. You’ll need to pick the link that pertains to your particular Blu-ray player manufacturer, and then extract the folder to a safe place on your hard drive. The folder will be named “AutoScript”; without opening the folder, copy it to your flash drive. Don’t open the folder under any circumstances — doing so could inadvertently alter the files within, causing them to function improperly, or not at all.

So, that’s everything you need; a functioning BD player properly set up, a properly formatted flash drive loaded with the AutoScript program, and the SACDExtractGUI program with the latest .exe update loaded onto your computer. I’ve done this on both Mac and Windows, and there’s one key setup difference. Windows applications and programs are automatically executable files upon opening, but that’s not necessarily true with Mac and Linux OS. The “SACD_Extract” file — which is the actual program that runs the process — has to be made a Unix executable file for Mac and Linux. Go again to page 15 on the HiFi Haven SACD ripping thread, to the same post that has the “Spoiler” links to the specific OS program files, and there are detailed instructions to easily make “SACD_Extract” an executable file using the Terminal function. I can’t honestly comment on Linux, but I know for a fact that it works with Macs.
All Blu-ray players have a USB port on the back panel, and some have one on the front panel as well; for some reason, the program seems to work more effortlessly when you insert the USB flash drive with AutoScript into the rear panel USB port (yeah, it’s much less convenient — sorry!). Connect the Blu-ray player to your network (if hard-wired) with the flash drive inserted, then power it on. It doesn’t need to be attached to a monitor, but you need to be able to determine the network address of the player. Since most networks tend to re-assign IP addresses with some frequency, it can be a bit of a task to keep up with your player’s current IP address. A handy smartphone app is FING, which will scan your network and identify your player’s IP address for you — it’s super-simple to use.

Then navigate to the location of the SACDExtractGUI program and double-click to open it; first of all, at the very top of the page and under “Program,” you’ll need to navigate to the location of the “SACD_Extract” executable file. There’s a test button and a prompt below will confirm that it’s working properly. Just below that, click the “Server” button, then enter the IP address of your Blu-ray player; the port will always be “2002,” and you can ping it and test it to make certain that you’re connected and the port is accessible. This program will work for extracting both the Stereo and Multichannel layers of an SACD, but be forewarned — that’s a ton of data, and ripping the entire contents of an SACD can easily run in the 4-plus GB range. For that matter, the stereo DSD files are very commonly 1 GB to 2-plus GB, so prepare yourself mentally for the long haul if ripping multichannel. In my experience, a typical stereo DSD extraction takes about 10 minutes or so.
The program offers multiple choices for ripping; you can rip the contents of the SACD to an ISO file — which is strictly for archival purposes, and can’t be played back without extracting the DSD files from it. Your other two choices are ripping as DSD Storage Facility (DSF) or DSD Interchange File Format (DFF). The difference is that ripping as DSF allows for the inclusion of metadata, and DFF does not, so if music library organization is important to you, DSF ripping is the only logical choice. So depending on what you want to extract, check “DSF” and Stereo and/or Multichannel. You might want to do a test rip; some DACs tend to insert a “pop” between DSD tracks. So you might want to also check the “Padding-less DSF” box, which tends to eliminate any problems of that sort. I’ve used it with all my rips, and haven’t noticed any issues of any sort.
The last thing you need to do is to navigate to your storage location, or wherever you plan on placing the ripped files for the short term. If you don’t browse to create a path for the Output Directory, the program will automatically place your ripped files into individual folders within the folder where the program is located on your hard drive. Just make certain that you have plenty of storage space available; I’ve ripped over 150 SACDs so far (in less than five days!), and ripping only the Stereo layers has already totaled almost 350 GB. I then transfer the files to another SSD that’s network-connected — surprisingly, the large files copy across my wired network very quickly. I then wipe them from my computer’s hard drive — at one point recently, I came within 1 GB of maxing out my computer’s M2 SSD drive, which wouldn’t have been good. And of course, you need to have some storage redundancy, just in case disaster happens and you lose a hard drive. You don’t want to have to go through this process again!
This surely goes without saying, but the ripping process is fairly labor-intensive for your computer. Not only is the laser drive of your Blu-ray player placed under a fair amount of stress, but it’s also helpful if your computer has a fairly robust processor with multiple cores, utilizes a solid-state drive, and is equipped with plenty of RAM. I’m using a fairly fast Intel Core i5, quad-core processor with an M2 SSD boot drive and 8 GB of RAM. It makes the process fairly effortless, but when an SACD rip is underway, my computer’s fan runs almost constantly and there’s a lot of buzzing and clicking — it’s obviously a pretty involved process.
By this point, if everything is a go, you’ll need to turn on the BD player again; because of the AutoScript on the inserted flash drive, the disc drawer should automatically open (I’ve noticed that it sometimes goes through this motion a couple of times — nothing to be worried about). Insert your chosen SACD, press the close button, and wait for the disc to load and show you the total disc playback time on the player’s display. If at any point, “WAIT” shows up in the display, something has gone wrong. But if the timing shows up okay, then touch the power button to power the machine down; when the machine display goes blank and the unit shuts down, remove the flash drive from the back of the machine. Then click the “Run” button on the SACDExtractGUI program; within a few seconds, the program should start, and you’ll see the disc ripping in the GUI display on your desktop.
As I noted above, if you’re only ripping the stereo layer of an SACD, it usually takes about ten minutes or so, and that’s for a hard-wired or wireless connection. And you don’t need to reinsert the USB flash drive with every rip; once inserted, it’s usually good for six or eight SACD rips. My experience is that the program tends to “lose its mind” after about six or eight rips, and the process is very specific to get back on track. If you go through the normal process and “WAIT” appears in the BD player display, a reboot of the player is required, and this can only be accomplished by physically power-cycling the unit by unplugging it from the power source and then re-plugging it. At that point, you also need to re-insert the flash drive; it’s basically just like starting over again, and the process has to be exact every time. 1) Unplug the BD player from the power source, 2) re-insert the flash drive, 3) re-plug the BD player to the power source, 4) insert the SACD, 5) power down the BD player after the total time shows up on the display, 6) remove the flash drive from the rear of the player, and 7) press the “Run” button on the extraction program. Follow these steps, and it works really effortlessly, and once you get the drill down, every single time.
It probably took me ten days to figure out how to get the very first SACD to rip; it was pretty much a combination of small errors and poor sequencing of events on my part. Probably the biggest hurdle for me was the whole “power cycling the BD player by unplugging it and replugging it” thing, which seemed really counterintuitive to me. And getting the flash drive with the AutoScript program properly formatted — this is vitally important. Also, if you’ve been ripping with a wired connection, and then decide to try wireless — the setup will revert to the wired IP address, which will have to be changed manually on the ripping program GUI. It really, really helps if your internet download speed is fairly fast; mine is only about 30 Mbps, and it works well with most everything, but don’t try running multiple devices simultaneously — your wife or significant other will end up getting kicked off the Wi-Fi signal, and if your situation is anything like mine, all hell will break loose!

I mentioned earlier that choosing to rip to DSF files is a great choice because it allows for adding metadata and images to the files. It’s a bit more difficult than editing the metadata with FLACs and other digital media, but I’ve found a really great freeware program, MP3tag, which works pretty effortlessly with DSF files. But it’s a little bit of a learning curve! So far, after about 160 ripped SACDs, I’ve pretty much discovered that you generally get most of the necessary metadata as part of the rip process, but it may need a little tweaking here and there. Some of the fields come up with incorrect or marginally correct information, but I’ve decided that having access to the music is the most important thing here, and if the metadata is less than perfect, I can live with that. You’ll definitely want to add album artwork to the files, and I’ve discovered by trial and error over a period of several years that after you drag the DSF files into MP3tag’s file name window, you need to use your cursor to highlight all the file names before you make any batch alterations to the tags. For example, when adding album artwork, you simply drag it into the artwork window (with all the tracks highlighted), then go to the top of the frame and click on the “Save” icon (it’s a floppy disk). Just keep the file names highlighted throughout the editing process, then click Save; that guarantees that everything is retained in your tagged information.
While there’s a lot of really great information at the HiFi Haven SACD ripping thread, it’s kind of pieced together in a patchwork manner, and takes a fair amount of dedication and desire to get things working. That said, I now feel pretty much like an expert of sorts at this — and it’s really gratifying to simply click a button and get really great DSD playback from my digital library without all the fuss. The sound quality is every bit as great as from a spinning disc — it’s darn near intoxicating! I’ve been listening to a ton of music that I don’t listen to as often as I should because of the added convenience factor, and I still stand by my previous declaration — DSD to me sounds so very much closer to analog than anything else out there.
Thanks to Mikey Fresh and everyone over at the HiFi Haven website for their dedication and perseverance in making this technology much more manageable for those of us who weren’t born computer geniuses. Oh, and in the three weeks since I spotted my working BD player at a Goodwill for $11, I’ve seen a couple more at about the same price, and they’re all over the internet. If you have any interest in this at all, have a fairly large library of SACDs and would like to try ripping them, it might be prudent to pick up a player or three just to have on hand. I know I will!
Header image: MSB Technology Universal Media Transport V.
0 comments