Every so often I find it’s generally good practice to recalibrate my room to make sure that my system is performing well. This is not just so that I can check to ensure well-balanced output from each of the speakers, but also because of wanting to check in relation to my own hearing.
It can be easy to think that once you have set up your system then you’re golden, and no more adjustments are required. If you’re like me, though, no doubt you continue to hunt the ever-desirable sonic improvements that may be had.
Also, it’s true that as we age, our hearing gradually degenerates to some extent, but if we wish, we can do something to compensate for it with the settings on our A/V receiver (or preamp/processor).
We know that when setting up loudspeakers for best in-room response, the measurements taken by calibration microphones can yield quite significant frequency response differences when taken just fractions of an inch or a few centimeters apart from each other. So, how much importance would you place on checking your system if you thought one of your speakers had been accidentally moved, or perhaps you’d mis-adjusted their toe-in, or you suspect your listening position might be more off-axis than it should be. (Has my center imaging been compromised?)
What prompted this further tweakery on my part was finding out about the useful software developed by Audio Advice, an audio/video retailer and systems integrator. Headed by CEO Scott Newnam, they have showrooms in Raleigh and Charlotte, North Carolina, and have created a free-to-use online interactive utility that I think you will enjoy playing with, even if you don’t make use of its powerful visualization benefits – of which there are many. It’s called the Audio Advice Home Theater Designer.
I have always had great respect for an architect’s ability to pre-visualize the building they perceive in their mind’s eye. To be able to take a design concept they have in their head and then create what they have envisioned, as a practical living space you can inhabit, walk around in and interact with, truly is an art form. In particular, understanding how the light will fall and where it will reflect, to enhance the living experience, is an incredible art form in my humble opinion.
Given that I am not an architect, as well as perhaps the majority of our readers, the Audio Advice Home Theater Designer may provide you with just what you are after, particularly if you are endeavoring to have a new home theater, stereo system or entertainment room built from scratch. Even if not, I challenge you not to be tempted to try it, to see if you may not be able to take something away from its powerfully useful interface.
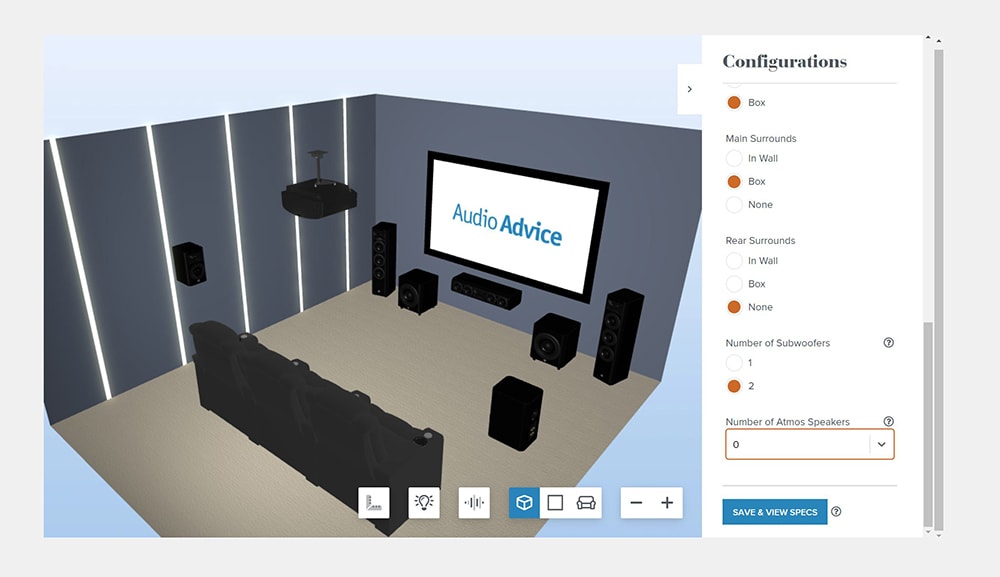
Initially, you create your “virtual” room by inputting its dimensions. The program is limited to rectangular/square form factors, and will only display solid walls, so you’ll have to take mental note of any doors or windows in your room. Nonetheless, the Home Theater Designer has a few brilliant tricks up its sleeve. Once you have entered your room proportions (and you’ll see the “virtual” room change size as you do this – pretty neat), you may then populate your room with the number and rows of seats you want, and even their size. You can also enter the screen size of the video display and the distance from the display to the seats, the number and type of main, surround and height speakers and subwoofers, and even the width of the aisle you may want. Other factors can also be entered.
Here’s where it gets really interesting. You can use your mouse to rotate the room in 3-D to see what the setup looks like from different angles. You can also move your seating position closer to or farther away from the front wall – and the speakers will change their positions in the room to indicate their new optimum locations! If you move the seating position too close to the front wall or rear wall, the software will warn you of inappropriate seating placement.
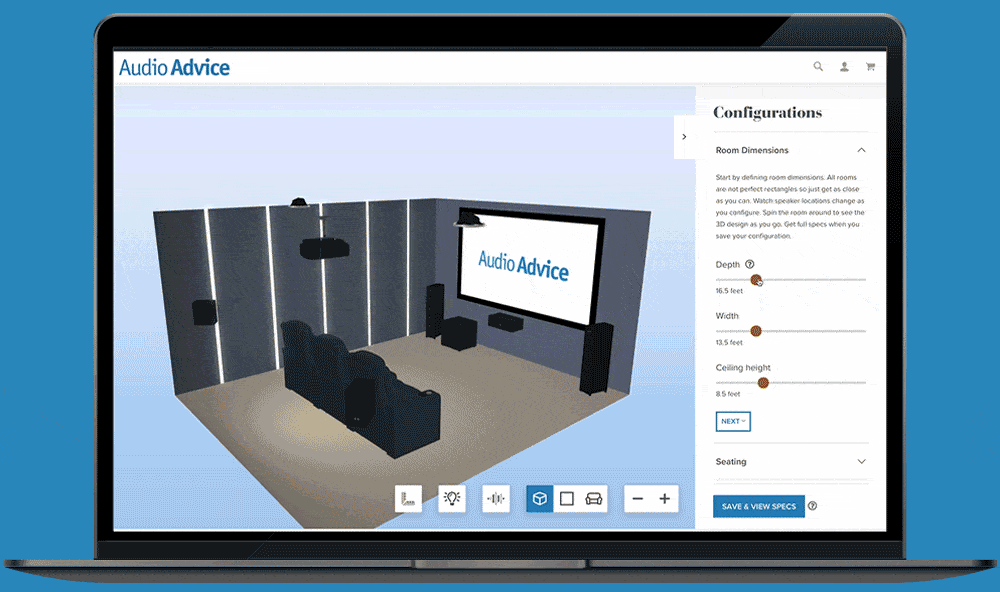
Home Theater Designer demo.
When you’re done, you can save all the parameters, and the software will then give you measurements of where to place all the speakers, how far the video display should be from the floor (found in your saved summary file, which you access by logging into your saved rooms), and other factors, including the amount of acoustic paneling recommended for the room. (You can even save multiple room configuration options.)
At a glance, you may spot things that you simply hadn’t noticed before. For example, in my quadraphonic system, my surround speakers were not in ideal locations and the toeing-in was off with respect to the primary seating position. I was able to quickly rectify that, and then re-run my A/V receiver’s speaker level and distance calibration to accommodate the new speaker positionings. Because I tend to sit to one side of my listening sofa, my center imaging was off. After re-measuring the distances, levels and positions of my front mains and adjusting my listening position, I could hear an appreciable improvement in imaging.
When you run the Home Theater Designer software, you may be forgiven for initially thinking it’s oversimplified and that there’s not much to gain from using it. However, there are some very useful additional features. For example, I have large bookshelves (not bookshelf speakers), to the right and left of my front main speakers, which limit how far apart the speakers may be placed apart from each other. Using the software, I can bring my main seating position in as close to the front wall as I want to, and the main speakers will then move to their proper distance from each other, in real time. However, once the speakers are too close together to produce an acceptable soundstage, the software will not permit them to get any closer, and it even gives a warning that you’ve exceeded the recommended distance. (Of course, you should also consult your loudspeaker owner’s manual for placement recommendations, and don’t discount your own ears!) You’ll quickly see some traditional triangular left speaker-listener-right speaker layouts come to life. (I also found it worth experimenting with the main seating position being about twenty percent further back from the front main speakers compared to the distance between them.)
With this software I now had the ability to see how much leeway I could take advantage of by alternatively setting up a closer-field listening experience.
Additionally, there’s a useful semi-translucent overlay that represents the sound emanating from your system as a blue “light” source. This is particularly nice as you widen your speaker placement, as you can see the expected sound field open accordingly along with your relative seating position within it. To better visualize the main speakers, you can temporarily turn off the Atmos in-ceiling speakers by setting their value to zero, and then, from a top-down view, more readily see the sound dispersion across the room for stereo imaging. You may want to use this perspective when visualizing your seating distance from the front speakers.
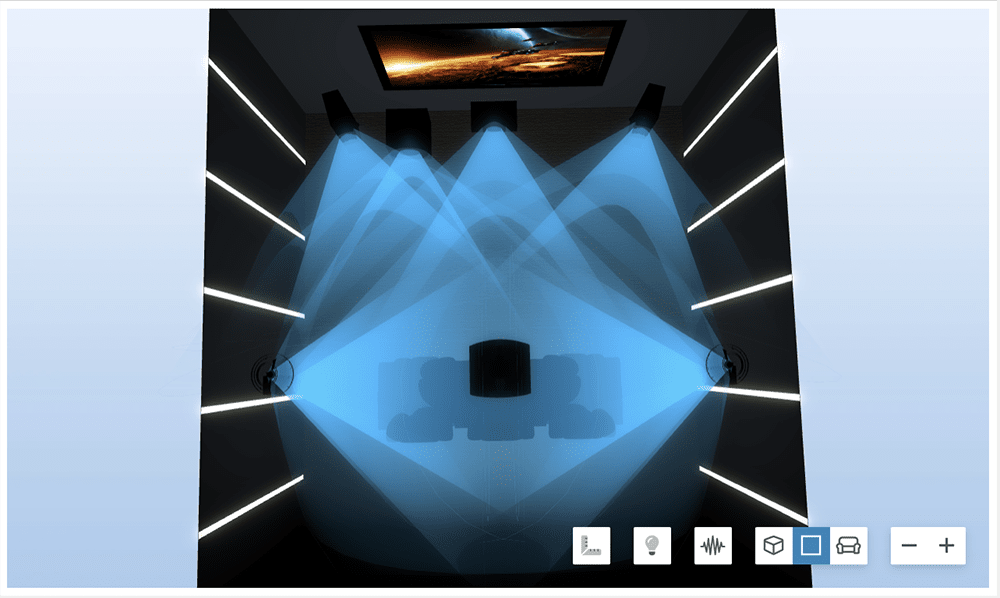
Home Theater Designer software showing speaker dispersion, top view.
It must be stressed that Home Theater Designer won’t magically replace a professional custom-installation specialist, who can provide valuable advice in dealing with subwoofer placement, managing room nulls, treating a room’s first reflections via diffusers and absorbers, and many other essential considerations.
I recently purchased a new eARC (Enhanced Audio Return Channel) TV, and Home Theater Designer proved useful for another reason. If you click on the software’s top-down view and move your seating either farther toward or away from your viewing screen, you will get a readout of your screen viewing angle and how it changes respectively. This allows you to make design choices to maintain more of a cinematic viewing angle, if you choose a THX 36-degree recommended viewing angle, or the SMPTE (Society of Motion Picture and Television Engineers) minimum 30-degree recommendation.
Returning to the benefits of reviewing my setup for audio: Home Theater Designer made me reexamine the all-critical bass output from my subwoofer. I had already re-measured its phase and delay for what I considered to be optimal integration with my front stereo speaker pair, but after making adjustments to the rest of the system’s levels using Home Theater Designer, I increased the subwoofer’s SPL, and heard more improvement in the richness, textural depth, and overall emotional engagement in my music. (To measure SPL, I used the basic but effective Smart Tools Sound Meter smartphone app.
Although billed as a home theater design tool, Home Theater Designer’s practical visualization merits helped me recognize areas for improvement, initiate fresh work on my audio system, and gain better results from it. Perhaps it can provide inspiration for you too.
I asked Audio Advice’s Scott Newnam to give us some additional insight.

Audio Advice’s Scott Newnam.
Russ Welton: How did you come to make this available for everyone rather than a chargeable service upfront?
Scott Newnam: At first we considered charging a fee to use the tool to help offset the high investment costs of it. However, it launched in the middle of the pandemic when there was a lot of turmoil, so we scrapped plans to charge and just made it free to everyone.
RW: What would you say are the most advantageous applications most often overlooked by end users?
SN: There are two things that are probably taken for granted by most people using the tool. The first is that it dynamically moves speakers and all other components in the system to achieve an optimal theater design as you change dimensions and speaker layout. In other words, it not only places speakers within Dolby specifications but will optimize speaker locations dynamically if you remove speakers or add a row of seats or anything else. If you remove the side surrounds, for instance, it will shift the rears to provide better audio immersion.
The second is that it will turn any part of the design orange if it goes out of specification. So, as you move your seats forward or backward it will constantly adjust speaker locations to provide an optimal experience within specification until it can no longer stay within specification. Then the seats might turn orange if you have them too far forward for example. Many users don’t realize they can then just grab the seats with their mouse and move them forward or backward until all of the orange is gone and everything is within specification.
RW: What are any plans for its future development, perhaps regarding subwoofer placement or something else?
SN: We have a long list of enhancements we want to do. We have prioritized them and are rolling them out incrementally. For instance, we had a lot of people from Europe and other parts of the world using the tool. They kept e-mailing and asking if we would enable the tool to use the metric system. We literally just rolled out a toggle button that is in meters and centimeters. We also enabled six Atmos channels instead of four. You can imagine all of the cool things we have on the list to add – keep watching and you’ll see them roll out one by one.
RW: What do you wish you were asked but either never or rarely are?
SN: What is the business model behind providing the free tool and all of the free buyer’s guides and videos on your site? The model is pretty straightforward. We provide enormous amounts of free advice through the tool, as well as buyers’ guides and how-to videos and reviews on our website. We then back this up with a top-notch team of system designers across the country who answer questions on the phone and via chat – none of whom are on commission. Then we offer quality audio and home theater products with a price guarantee, two-day shipping, hassle-free returns, and lifetime support. The result is that we get the chance to help a lot of people with their audio and home theater systems, which is really our number one goal. We are fortunate enough that a good number of those people ultimately like our value proposition and our experience, and decide to support us with their purchases.
Our interview with Scott Newnam will continue in Issue 161, where he will talk more about stereo and home theater speaker and subwoofer setup.