COPPER

A PS Audio Publication

Issue 173 • Free Online Magazine

Issue 173 Speaker Stories

Phantom of the Stereo: Creating a Convincing Center from Two Speakers

Phantom of the Stereo: Creating a Convincing Center from Two Speakers

If, like me, you are truly determined to get the best presentation from your stereo system, and specifically, desire the ultimate in clarity and center imaging from vocals, what are some of the things you can do to help accomplish this?

I thought it would be helpful to collate a checklist of things I’ve found useful to do to optimize the presentation of your “phantom” center channel. (Some of this may be familiar to veteran audiophiles, but knowledge and reminders are always beneficial.) Perhaps, as a die-hard stereo-only listener you feel that some of your playback is suffering from an underwhelming presentation of vocal presence. It may be that improvements can be made that are just waiting to happen.

Of course, the further to the left or right you sit from you main (centered) listening position, the more you will lose some of the focus of the main singer, who is typically mixed to the center. (There are exceptions, such as some early stereo Beatles recordings, for example.) And we’re presuming your stereo speakers are set up in a traditional symmetrical format. This is nothing new. But you may be able to gain a more engaging listening experience by improving your phantom center channel.

As most of us know, a phantom center channel happens when you set up your stereo speakers in such a way that the sonic image they present includes a third presence, a solidly tangible vocal (or instrument) between and in front of your speakers. When you really dial it in well, it can sound as if the singer (or main instrumentalist) is right in front of you, with the rest of the band members further to the back and sides.

If you are fortunate enough to have a dedicated listening room, it may be easier to apply these suggestions. If your listening room also happens to be your living room or other non-dedicated space, you may be able to adopt some of these techniques, albeit to a lesser degree.

A typical approach to speaker positioning may start out with having the speakers set twenty percent less wide apart from each other than from the listening distance from the speakers to your seating. In other words, if you sit 15 feet back from your speakers, then place your speakers with a footprint 12 feet apart from center to center. If you sit 10 feet back, place the speakers eight feet apart and so on. However, if you have them set up like this, you may be content with your music’s tonal balance, but still be missing out on a more refined vocal midrange presentation. This may occur due to a less-than-optimally-aligned soundstage and speaker positioning, and/or unwanted reflections coming off of coffee tables or other furniture, or in some extreme cases, physical obstructions to the direct line-of-sight of your speakers. And don’t forget to keep your speakers away from the front and side walls sufficiently to play into the room. This may be obvious (and you may have to compromise in how far away you can keep them from the side walls), but oftentimes, just bringing the speakers forward a few more inches forward can really help.

After getting the speakers in what seems to be the optimal position – and remember, there’s no “best” speaker location, only the one that provides the best mix of tonal balance, spaciousness and imaging including achieving a solid phantom center channel – consider how symmetrically the furniture, other items, and your system’s electronics are laid out in your room. Ideally, the speakers and everything in the room should be symmetrical, yet as we know it’s not always, or maybe not even ever possible if you don’t have a dedicated listening room.
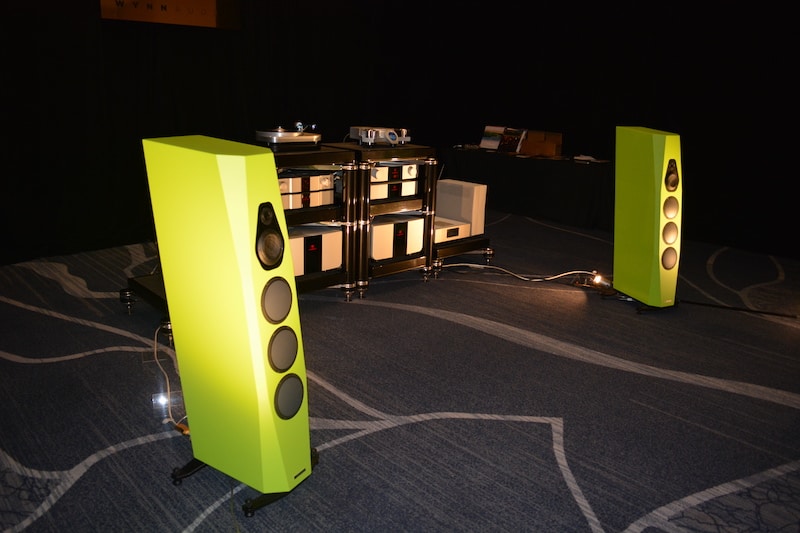
 

These Vimberg speakers delivered a solid center image in the Wynn Audio room at AXPONA 2022. Courtesy of Frank Doris.

These Vimberg speakers delivered a solid center image in the Wynn Audio room at AXPONA 2022. Courtesy of Frank Doris.


Using absorption and diffusion on the side walls to control the first reflection points can be extremely advantageous. There’s an old trick for finding these points. Sit in your listening chair and have a friend walk along the walls while holding a mirror at ear level. When you can see one of your speakers in the mirror, that’s a first reflection point. Mark this point, then have your friend keep walking until you can see the other speaker. Mark that point also, and repeat the process for the other wall. Then apply room treatment to those areas on the walls. There’s a good video from GIK Acoustics that illustrates the procedure.

But what about the front wall? In many cases this wall is completely overlooked, and no damping is utilized at all (except when people put bass traps in the corners, which can be very effective in smoothing out a room’s low-frequency response, but that’s a subject for another article). And yet by using some basic damping material, even thick foam cladding placed just behind the main speakers themselves, this can serve to take some harshness out of the room’s top-end response, as the foam will be acting as a good absorbent material of the higher frequencies produced by the rear of the speaker. Not only can this improve imaging overall including the phantom center channel, you may achieve improved bass response.
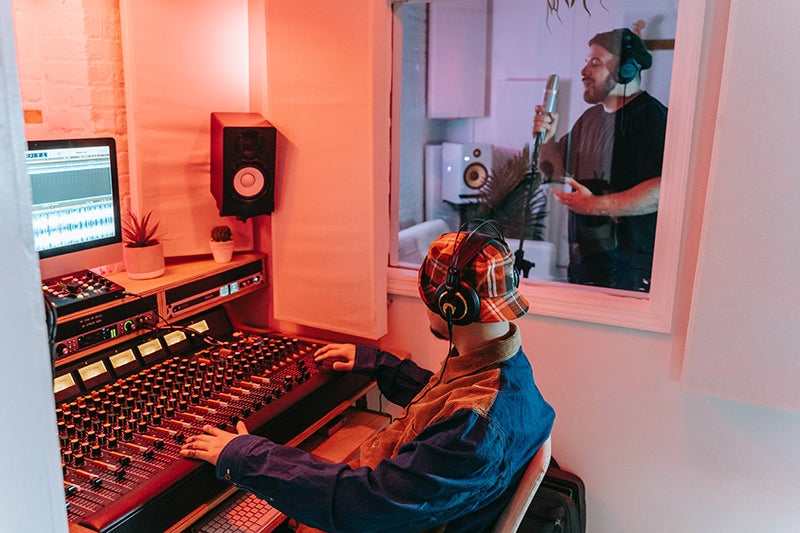
 

Achieving a good phantom center image starts in the recording studio, whether listening to speakers or headphones. Courtesy of Pexels.com/Anna Pou.

Achieving a good phantom center image starts in the recording studio, whether listening to speakers or headphones. Courtesy of Pexels.com/Anna Pou.


Returning for a moment to the room’s symmetry: not all symmetrically-placed objects are a good thing. Looking at my own system in the past, one of the biggest culprits for impeding the center phantom image was a large glass coffee table. It blocked and diffused the output from my speakers. The reflected and refracted waves off of its surface also were detrimental to the phantom center channel presentation, and the imaging and soundstaging overall. If you have to have a table in the listening area, a working compromise could be to have a smaller table, or simply set it to the side of the listening position when wanting to hear your system more critically. An added benefit of removing a table completely is having more room to stretch your legs and navigate the room more easily without the risk of knocking drinks over onto your carefully-selected sound-absorbing floor rug!

Generally speaking, though, a small table set to the side now works well without having an obviously negative impact on vocals and other phantom-center sounds. If you absolutely cannot move the table, you may choose to cover it with something absorptive, or even an inventively fabric-covered piece of foam. Note: for those who have a TV in the middle of an A/V setup, covering the TV with a blanket or other absorptive material can have the same beneficial effect when listening critically.

Another improvement could be rearranging the placement of your entertainment center cabinet or equipment rack. Very often the natural aesthetic choice is to place these in between the stereo speakers, but, if they’re of any significant size and your speakers are placed either to the side or even partially behind, you will suffer a loss in the center-image presentation. If possible, consider setting up your equipment to the side and/or behind the speakers. You may be surprised at how much of your sound is being gobbled up and refracted around your gear.

The overarching principle is that you want to keep any physical obstructions between and in front of your speakers to a minimum if you can’t eradicate them, or if you can, do just that: remove the obstructions with some thoughtful furniture and equipment placement adjustments. Optimizing the cleanest line-of-sight from your speakers is key. And of course, there are the obvious factors of using high-quality speakers, and setting your balance and volume correctly.

This latter point is critical and may be set according to your listening distance from the speakers. 75 dB is often considered a suitable benchmark for prolonged periods of listening. This is already quite a healthy level, to say the least, so be aware that if you are listening for extended periods, the higher you set the volume above this level, the more likely you will be contributing to hearing damage and or loss. That said, fine-tuning your speaker distances and listening volumes will significantly contribute to your phantom center imaging along with a less fatiguing or draining listening experience. You want to be comfortable and not taxed as you relax, or dance around!

Some speakers are designed with a wide, or alternatively, narrow dispersion pattern, and this can be a matter of personal preference. Good-quality narrow dispersion speakers have been designed with focusing the sonic presentation clearly in mind. Although this too may be true of high-quality wide-dispersion speakers, the latitude you may have for adjusting speaker toe-in may be less than with a wide-dispersion model. Of course, this is a generalization, but don’t jump to the conclusion that narrow-dispersion speakers will not produce an amazing result. They may well be your preference for both your seating position and that of other listeners in the room. Experimenting by making toe-in adjustments of 1 inch and then even one degree at a time can really help you hit that sweet spot.

It would be remiss not to mention the significance of using the best-possible source material. As always, be sure to test out your results with material you know particularly well as you track down and achieve these refinements.


Header image courtesy of Pexels.com/Akwice.

More from Issue 173

View All Articles in Issue 173

Search Copper Magazine

#230 Camaraderie by B. Jan Montana May 04, 2026 #230 AXPONA 2026: A Family Gathering by Paul McGowan May 04, 2026 #230 Pianist Ryan Benthall Explores Jazz Realms and Far Beyond With Divine Sky by Frank Doris May 04, 2026 #230 The Vinyl Beat in AXPONA-Land by Rudy Radelic May 04, 2026 #230 Teddy Thompson’s Musical Growth Deepens With Never Be the Same by Ray Chelstowski May 04, 2026 #230 More Fun in the Sun: Florida Audio Expo, Part Two by Frank Doris May 04, 2026 #230 CanJam NYC 2026 Show Report: Heady Sound, Part Two by Frank Doris and Harris Fogel May 04, 2026 #230 Sonic Youth On Murray Street by Wayne Robins May 04, 2026 #230 Graffeo Coffee: A Symphony of Sensory Experience by Joe Caplan May 04, 2026 #230 The Saul Authority: The Story of Hi-Fi Pioneer Saul Marantz by Olivier Meunier-Plante May 04, 2026 #230 How to Play in a Rock Band, 23: Encounters With Famous Musicians, Part Two by Frank Doris May 04, 2026 #230 An Outlier in the Rack: A Vintage BIC Beam Box by The Staff at Just Audio May 04, 2026 #230 PS Audio in the News by PS Audio Staff May 04, 2026 #230 A Cautionary Tale by Rich Isaacs May 04, 2026 #230 Reel-to-Reel Roots, Part 33 (Revised): Ken Kessler Reports On the 2026 (British) AudioJumble by Ken Kessler May 04, 2026 #230 Text Messaging by Frank Doris May 04, 2026 #230 The Audiophile Rat Race by Peter Xeni May 04, 2026 #230 On the Rocks by Rich Isaacs May 04, 2026 #229 The Earliest Stars of Country Music, Part Three by Jeff Weiner Apr 06, 2026 #229 The Healing Power of Music and Sound at the Omega Institute by Joe Caplan Apr 06, 2026 #229 CanJam NYC 2026 Show Report: Heady Sound, Part One by Frank Doris Apr 06, 2026 #229 Florida Audio Expo 2026: Warming Up to High-End Audio, Part One by Frank Doris Apr 06, 2026 #229 Quick Takes: Anne Bisson, Sam Morrison, The Velvet Underground, and the Stooges by Frank Doris Apr 06, 2026 #229 The Vinyl Beat: New Arrivals, and Old Audio Show Demo Scores to Settle by Rudy Radelic Apr 06, 2026 #229 Harvard Gets a High-End Audio Education by Frank Doris Apr 06, 2026 #229 No Country for Old Knees by B. Jan Montana Apr 06, 2026 #229 How To Play in A Rock Band, 22: Encounters With Famous Musicians, Part 1 by Frank Doris Apr 06, 2026 #229 The Soulful Grooves of Guinea-Bissau by Steve Kindig Apr 06, 2026 #229 Four-Hand Piano Performance at Its Finest by Stephan Haberthür Apr 06, 2026 #229 The People Who Make Audio Happen: Supreme Acoustics Systems’ Las Vegas Grand Opening by Harris Fogel Apr 06, 2026 #229 Blue Öyster Cult: Tyranny and Expectations by Wayne Robins Apr 06, 2026 #229 Guitarist Rick Vito’s Cinematic New Album, Slidemaster by Ray Chelstowski Apr 06, 2026 #229 Measurements and Observational Listening by Paul McGowan Apr 06, 2026 #229 PS Audio in the News by PS Audio Staff Apr 06, 2026 #229 Back to My Reel-to-Reel Roots, Part 28: The Cassette Strikes Back by Ken Kessler Apr 06, 2026 #229 Are You Receiving Me? by Frank Doris Apr 06, 2026 #229 Hospitality by Peter Xeni Apr 06, 2026 #229 Cantina Gateway by James Schrimpf Apr 06, 2026 #228 Serita’s Black Rose Duo Shakes Your Soul With a Blend of Funk, Rock, Blues and a Whole Lot More by Frank Doris Mar 02, 2026 #228 Vinyl, A Love Story by Wayne Robins Mar 02, 2026 #228 Thrill Seeker by B. Jan Montana Mar 02, 2026 #228 The Vinyl Beat: Donald Byrd, Bill Evans, Wes Montgomery, Eddie Palmieri and Frank Sinatra by Rudy Radelic Mar 02, 2026 #228 Listening to Prestige: The History of a Vitally Important Jazz Record Label by Frank Doris Mar 02, 2026 #228 How to Play in a Rock Band, 21: Touring With James Lee Stanley by Frank Doris Mar 02, 2026 #228 The NAMM 2026 Show: The Music Industry’s Premier Event by John Volanski Mar 02, 2026 #228 The Earliest Stars of Country Music, Part Two by Jeff Weiner Mar 02, 2026 #228 From The Audiophile's Guide: A Brief History of Stereophonic Sound by Paul McGowan Mar 02, 2026

Phantom of the Stereo: Creating a Convincing Center from Two Speakers

Phantom of the Stereo: Creating a Convincing Center from Two Speakers

If, like me, you are truly determined to get the best presentation from your stereo system, and specifically, desire the ultimate in clarity and center imaging from vocals, what are some of the things you can do to help accomplish this?

I thought it would be helpful to collate a checklist of things I’ve found useful to do to optimize the presentation of your “phantom” center channel. (Some of this may be familiar to veteran audiophiles, but knowledge and reminders are always beneficial.) Perhaps, as a die-hard stereo-only listener you feel that some of your playback is suffering from an underwhelming presentation of vocal presence. It may be that improvements can be made that are just waiting to happen.

Of course, the further to the left or right you sit from you main (centered) listening position, the more you will lose some of the focus of the main singer, who is typically mixed to the center. (There are exceptions, such as some early stereo Beatles recordings, for example.) And we’re presuming your stereo speakers are set up in a traditional symmetrical format. This is nothing new. But you may be able to gain a more engaging listening experience by improving your phantom center channel.

As most of us know, a phantom center channel happens when you set up your stereo speakers in such a way that the sonic image they present includes a third presence, a solidly tangible vocal (or instrument) between and in front of your speakers. When you really dial it in well, it can sound as if the singer (or main instrumentalist) is right in front of you, with the rest of the band members further to the back and sides.

If you are fortunate enough to have a dedicated listening room, it may be easier to apply these suggestions. If your listening room also happens to be your living room or other non-dedicated space, you may be able to adopt some of these techniques, albeit to a lesser degree.

A typical approach to speaker positioning may start out with having the speakers set twenty percent less wide apart from each other than from the listening distance from the speakers to your seating. In other words, if you sit 15 feet back from your speakers, then place your speakers with a footprint 12 feet apart from center to center. If you sit 10 feet back, place the speakers eight feet apart and so on. However, if you have them set up like this, you may be content with your music’s tonal balance, but still be missing out on a more refined vocal midrange presentation. This may occur due to a less-than-optimally-aligned soundstage and speaker positioning, and/or unwanted reflections coming off of coffee tables or other furniture, or in some extreme cases, physical obstructions to the direct line-of-sight of your speakers. And don’t forget to keep your speakers away from the front and side walls sufficiently to play into the room. This may be obvious (and you may have to compromise in how far away you can keep them from the side walls), but oftentimes, just bringing the speakers forward a few more inches forward can really help.

After getting the speakers in what seems to be the optimal position – and remember, there’s no “best” speaker location, only the one that provides the best mix of tonal balance, spaciousness and imaging including achieving a solid phantom center channel – consider how symmetrically the furniture, other items, and your system’s electronics are laid out in your room. Ideally, the speakers and everything in the room should be symmetrical, yet as we know it’s not always, or maybe not even ever possible if you don’t have a dedicated listening room.


These Vimberg speakers delivered a solid center image in the Wynn Audio room at AXPONA 2022. Courtesy of Frank Doris.

These Vimberg speakers delivered a solid center image in the Wynn Audio room at AXPONA 2022. Courtesy of Frank Doris.


Using absorption and diffusion on the side walls to control the first reflection points can be extremely advantageous. There’s an old trick for finding these points. Sit in your listening chair and have a friend walk along the walls while holding a mirror at ear level. When you can see one of your speakers in the mirror, that’s a first reflection point. Mark this point, then have your friend keep walking until you can see the other speaker. Mark that point also, and repeat the process for the other wall. Then apply room treatment to those areas on the walls. There’s a good video from GIK Acoustics that illustrates the procedure.

But what about the front wall? In many cases this wall is completely overlooked, and no damping is utilized at all (except when people put bass traps in the corners, which can be very effective in smoothing out a room’s low-frequency response, but that’s a subject for another article). And yet by using some basic damping material, even thick foam cladding placed just behind the main speakers themselves, this can serve to take some harshness out of the room’s top-end response, as the foam will be acting as a good absorbent material of the higher frequencies produced by the rear of the speaker. Not only can this improve imaging overall including the phantom center channel, you may achieve improved bass response.


Achieving a good phantom center image starts in the recording studio, whether listening to speakers or headphones. Courtesy of Pexels.com/Anna Pou.

Achieving a good phantom center image starts in the recording studio, whether listening to speakers or headphones. Courtesy of Pexels.com/Anna Pou.


Returning for a moment to the room’s symmetry: not all symmetrically-placed objects are a good thing. Looking at my own system in the past, one of the biggest culprits for impeding the center phantom image was a large glass coffee table. It blocked and diffused the output from my speakers. The reflected and refracted waves off of its surface also were detrimental to the phantom center channel presentation, and the imaging and soundstaging overall. If you have to have a table in the listening area, a working compromise could be to have a smaller table, or simply set it to the side of the listening position when wanting to hear your system more critically. An added benefit of removing a table completely is having more room to stretch your legs and navigate the room more easily without the risk of knocking drinks over onto your carefully-selected sound-absorbing floor rug!

Generally speaking, though, a small table set to the side now works well without having an obviously negative impact on vocals and other phantom-center sounds. If you absolutely cannot move the table, you may choose to cover it with something absorptive, or even an inventively fabric-covered piece of foam. Note: for those who have a TV in the middle of an A/V setup, covering the TV with a blanket or other absorptive material can have the same beneficial effect when listening critically.

Another improvement could be rearranging the placement of your entertainment center cabinet or equipment rack. Very often the natural aesthetic choice is to place these in between the stereo speakers, but, if they’re of any significant size and your speakers are placed either to the side or even partially behind, you will suffer a loss in the center-image presentation. If possible, consider setting up your equipment to the side and/or behind the speakers. You may be surprised at how much of your sound is being gobbled up and refracted around your gear.

The overarching principle is that you want to keep any physical obstructions between and in front of your speakers to a minimum if you can’t eradicate them, or if you can, do just that: remove the obstructions with some thoughtful furniture and equipment placement adjustments. Optimizing the cleanest line-of-sight from your speakers is key. And of course, there are the obvious factors of using high-quality speakers, and setting your balance and volume correctly.

This latter point is critical and may be set according to your listening distance from the speakers. 75 dB is often considered a suitable benchmark for prolonged periods of listening. This is already quite a healthy level, to say the least, so be aware that if you are listening for extended periods, the higher you set the volume above this level, the more likely you will be contributing to hearing damage and or loss. That said, fine-tuning your speaker distances and listening volumes will significantly contribute to your phantom center imaging along with a less fatiguing or draining listening experience. You want to be comfortable and not taxed as you relax, or dance around!

Some speakers are designed with a wide, or alternatively, narrow dispersion pattern, and this can be a matter of personal preference. Good-quality narrow dispersion speakers have been designed with focusing the sonic presentation clearly in mind. Although this too may be true of high-quality wide-dispersion speakers, the latitude you may have for adjusting speaker toe-in may be less than with a wide-dispersion model. Of course, this is a generalization, but don’t jump to the conclusion that narrow-dispersion speakers will not produce an amazing result. They may well be your preference for both your seating position and that of other listeners in the room. Experimenting by making toe-in adjustments of 1 inch and then even one degree at a time can really help you hit that sweet spot.

It would be remiss not to mention the significance of using the best-possible source material. As always, be sure to test out your results with material you know particularly well as you track down and achieve these refinements.


Header image courtesy of Pexels.com/Akwice.

0 comments

Leave a comment

0 Comments

Your avatar

Loading comments...

🗑️ Delete Comment

Enter moderator password to delete this comment:

✏️ Edit Comment

Enter your email to verify ownership: